Containers: An introduction to Docker for systems administrators.
What the hell is docker? How is a container different from a VM? Why would I want to use it? How can I start using docker today? These questions and more answered by a sysadmin, for sysadmins.


What is Docker?
Docker is a free software package that allows you to run container images.
Container images are fully self-contained application packages which include all dependencies (code, runtime, system tools, system libraries and settings), allowing for ease of distribution and upgrade, better reliability (no more developers saying “well it worked on my machine”), and with lower overheads compared to using dedicated virtual machines per application.
There is extensive documentation provider by Docker themselves here; https://docs.docker.com/
The below image shows the difference between virtual machines and containers.
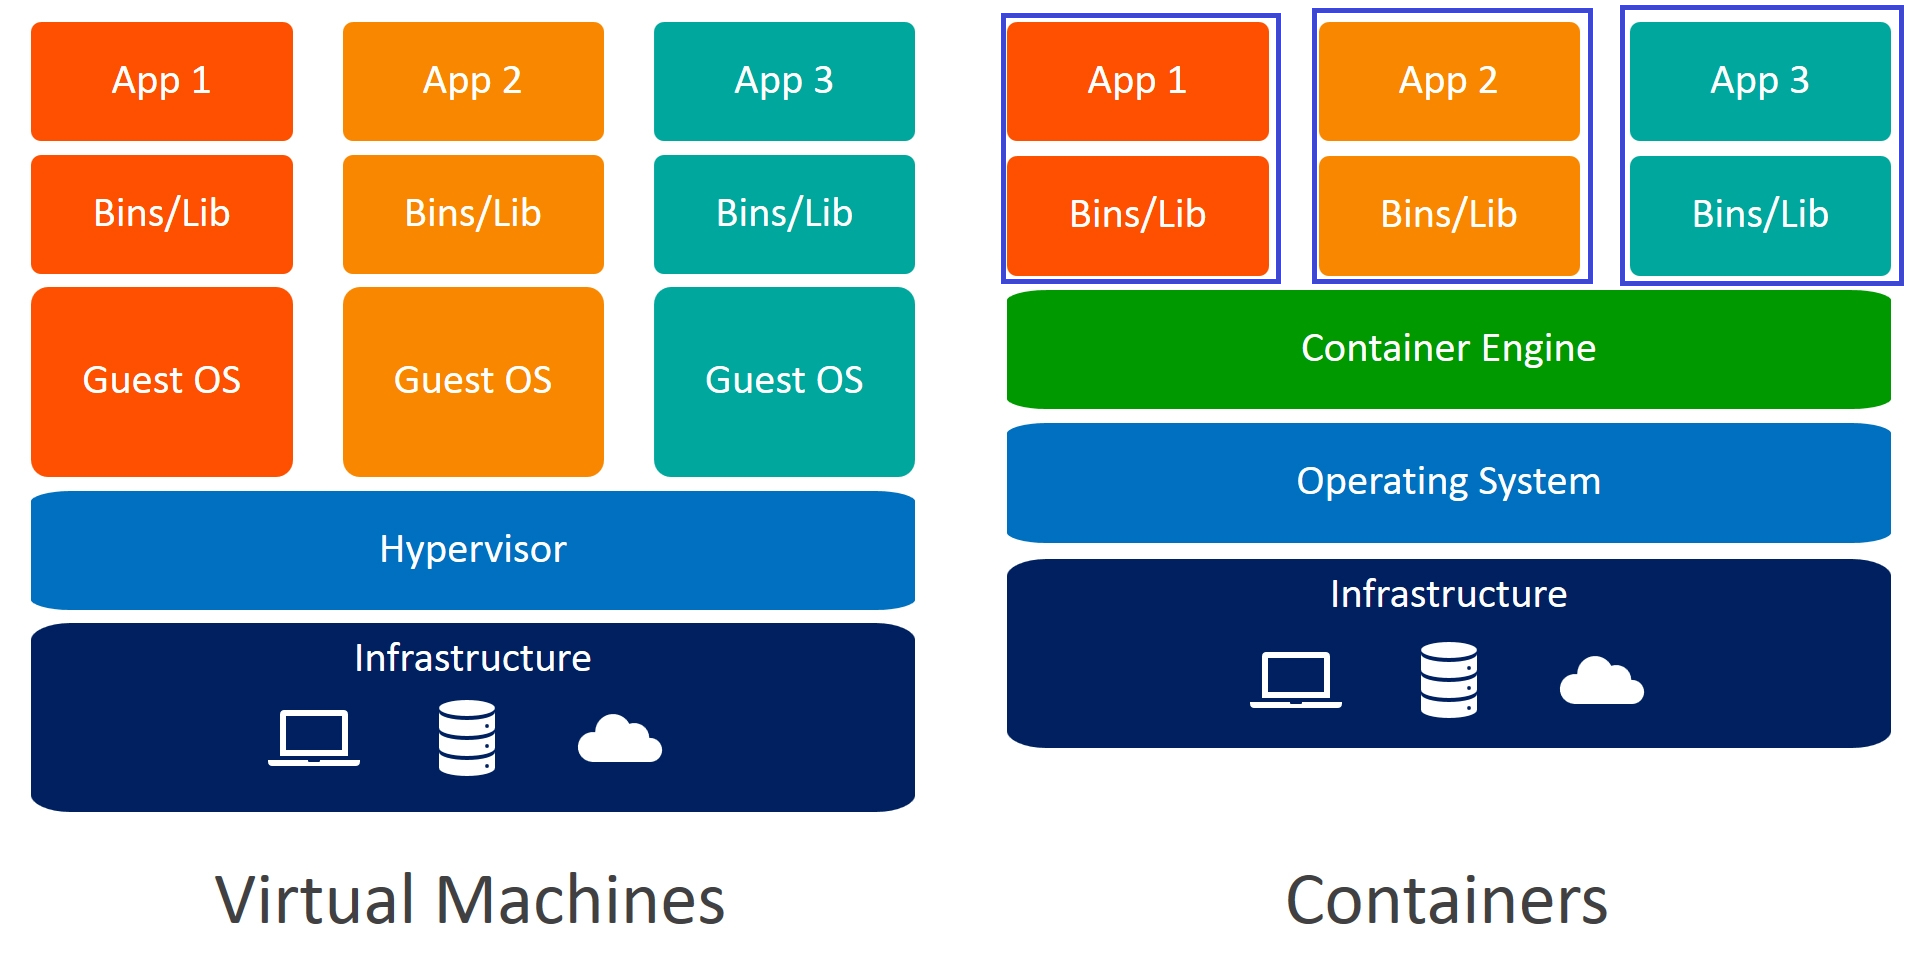
To help explain further, I think that the closest concept in VM world is that containers are more akin to OVF/OVA templates, where the vendor provides a fully configured environment and you simply specify variables (such as network etc) when deploying the OVF/OVA.
Why deploy an application using docker as a systems administrator?
Docker containers when compared to a legacy application running on a VM are:
- Much easier to update - simply stop the container, pull the latest image, start it again, done.
- Much easier to deploy - no need to create a whole new VM, no need to worry about dependencies (like .NET, specific Java versions, etc)
- Therefore more maintainable and less likely to become technical debt
Docker host operating system considerations
The Docker Host is the (physical or virtual) machine running the Docker engine. Docker containers are not impacted by which operating system the Docker engine is running on, as all dependencies are included in the container including the required OS elements. However, it is standard to run Docker under a Linux distribution, Docker on Windows has odd quirks and is less widely used, making it more difficult to support and troubleshoot. Therefore, I would strongly recommend running Linux as the host OS, specifically a widely used distribution such as Ubuntu.
It is important that the the architecture of the host OS processor matches the docker container images that you choose to run. For example, you couldn’t run an ARM container on AMD64/x86-64/x64 processor based hosts. This is important to consider if you're using a homelab environment where you might be using ARM-based machines such as Raspberry Pi.
What is docker-compose?
Without docker-compose, all containers are spun up and down from the host OS shell with (often-lengthy) commands (known as docker run commands). Docker-compose is instead a method of using infrastructure-as-code to define the docker environment. This allows a repeatable containerised environment of one or many containers to be defined in a config file, and then spun up from that defined config. It also allows you to use source-control such as Git to manage versioning of that config file.
Docker compose is written in YAML and the standard naming convention for docker-compose files is docker-compose.yml or docker-compose.yaml . If you create a file with this name, Visual Studio Code will automatically recognise that you are writing a docker-compose file, which can then provide you with syntax assistance. I would strongly recommending using VSCode for this especially so if you are currently creating your scripts and config files using notepad++ as it offers a number of benefits. It's especially helpful when writing YAML as YAML is very particular around indentation.
Most of the time, the provider/vendor of a containerised application will provide an example docker-compose.yml file so you know exactly which are the minimum required parameters to successfully bring a container up/online.
All docker-compose files start with the following and then the containers and their options are specified as explained further throughout this article.
version: "3.6"
services:
  someservice:
    #config for someservice container goes here
  someotherservice:
    #config for someotherservice container goes here
    #etc etc
Docker container images
Docker container images are precompiled containers provided by the vendor of the application - they are the docker equivalent of an OVF/OVA template in Virtual Machine world.
Docker container images are stored in container repositories such as DockerHub, and are pulled down as part of your docker-compose.yml file.
There are some projects such as linuxserver.io which containerize non-docker applications, which make it easy to deploy existing applications. I would recommend linuxserver.io as a good vendor of container images.
Below is an example excerpt from a docker-compose.yml file to create a container called "Portainer", pull down the latest version of Portainer from Portainer themselves (the syntax is vendor/container:version), and keep the application running (restart it automatically if it crashes unless intentionally stopped).
portainer:
    container_name: "portainer"
    image: portainer/portainer-ee:latest #get latest portainer version
    restart: unless-stopped #restart container unless its been intentionally stopped
Docker container environment variables
Environment variables are a way to pass configuration options down into a container, for example, Time Zone, or a secret.
Additionally environment variables are used to specify the user and group used to run the container. This is important to use when you are using persistent volumes, as incorrect user/group will cause permissions issues on host directories.
To identify the correct user and group to use, you should run the command id on your Linux host.
Below is an example excerpt from a docker-compose.yml file to create 3 environment variables, for the timezone, Linux user, and Linux group.
  environment:
    - TZ=Europe/London #set timezone
    - PUID=1000 #set user context within container, linux user ID 1000 (user) - for persistent volume permissions
    - PGID=1000 #set user's group context within container, linux group ID 1000 (user) - for persistent volume permissions
Docker container persistent volumes
By design, containers are ephemeral and are spun up as required and then destroyed when spun down.
Obviously for applications requiring any form of persistent storage this would be an issue (which frankly is most applications). Therefore persistent volumes are mapped to directories on the host OS to provide persistent storage to the containerised application.
For example, the below excerpt from a docker-compose.yml file which shows a host directory path /docker-storage/traefik/config mapped to a containers internal filesystem at the path /config.
  volumes:
    - /docker-storage/traefik/config:/config/ #config persistent storage directory
The standardised location for docker volumes is within the docker application directory, however for ease of administration I prefer to create a new directory at the root of the filesystem /docker-storage/ for this purpose.
If creating this on a new host use the following commands:
cd / #change to root directory
sudo mkdir docker-storage #use root account to create a directory at the root level
sudo chown 1000:1000 /docker-storage #change ownership to the account "user" which is a member of group "users"
Of course you can also mount remote volumes, for example an SMB or NFS share. I would recommend doing this by (for an NFS share):
- On the docker host OS, use sudo to create a directory in the
/mnt/directory. something like/mnt/nfs-share/ - Create an entry in the
/etc/fstabfile to mount your NFS share to the directory/mnt/nfs-share/on boot up. - Map the
/mnt/nfs-share/to the desired directory in your docker container. For example/mnt/nfs-share/:data/ - Make sure you have set the correct permissions on the
/mnt/nfs-share/directory for the docker user as specified in your PID/GID environment variables for the specific container. Use thechownandchmodcommands as appropriate. - Configure the correct NFS permissions on the NFS host side.
Docker networks
The standard docker network (bridge network)
The typical network choice for docker containers is the bridge network. The bridge network creates a new subnet which the containers connect to, and by default, when you run a container, the container doesn't expose any of its ports to the outside world.
You must define the ports within the docker-compose.yml to make a port available to services outside of Docker. This creates a firewall rule in the host, mapping a container port to a port on the Docker host to the outside world.
For example, the below excerpt from a docker-compose.yml file which shows mapping ports 80 (HTTP) and ports 443 (HTTPS) to the identical port numbers on the hosts.
  ports:
    - 80:80 #http port
    - 443:443 #https port
Note that only one container can use each port number on the host. Therefore, if you have multiple containers requiring, for example 443, you would need to use alternative port numbers for any conflicting services.
Note: Docker will not allow you to bring up a docker-compose.yml where the same port is used multiple times or if that docker-compose.yml contains a ports configuration which conflicts with already running containers.
Below is an example of mapping a containers internal port to a different host port within a docker-compose.yml file.
  ports:
   - 8080:80 #http port, externally accessible via 8080
   - 44333:443 #https port, externally accessible via 44333
Obviously this means if you want to access the service, you will need to specify the port number, as a web browser will only look for HTTPS/443 and HTTP/80.
For example, for a container running on dockerhost.infrastructureinsider.co.uk, configured with external port 8080 mapped to internal port 80, you would browse to: http://dockerhost.infrastructureinsider.co.uk:8080
The above also depends on DNS records being created for the hostname. I really recommend always using a two-tier DNS record design like the following
- An A record created for the host itself, for example:
dockerhost.infrastructureinsider.co.uk A 10.182.10.31 - CNAME record created for the running service within our customer-facing DNS zone for services, pointed back to the above A record, for example:
someservice.infrastructureinsider.co.uk CNAME dockerhost.infrastructureinsider.co.uk
A more elegant solution for this issue is of course to use a reverse proxy to handle the requests, explained further below.
What is a reverse proxy and why do we use it with containers?
Use of a Reverse Proxy is required in order to have the following features:
- friendly hostname resolution to container interfaces without specifying a port number
- routing HTTP/HTTPS requests to non-standard ports
- applying an SSL certificate to the front-end (ACME/Let's Encrypt, or even just a PEM-encoded cert & private key in a directory).
The reverse proxy I choose to use in my docker environments is Traefik, also running as a docker container.
I like using Traefik as it is specifically designed to interact with the Docker runtime on the host (also called the Docker Socket - located at /var/run/docker.sock), which allows Traefik to dynamically adjust the configuration based on the containers present, and specific labels added to the container configuration in the docker-compose.yml file (and without restarting the load balancer).
Interacting with the Docker Socket also allows Traefik to communicate directly with the containers internal ports, meaning opening host ports is no longer a requirement.
I'll be writing another article on how to configure Traefik reverse proxy for Docker.
Lets talk Docker management and administration
Docker Comands
The following Docker commands are those I find I'm using the most:
docker-compose -f docker-compose.yml up -dto bring up your docker compose specified containers (run in the background, omit-dfor foreground)- and
docker-compose -f docker-compose.yml downto bring them down docker images --format "{{.Repository}}:{{.Tag}} | xargs -L1 docker pullto update all of the docker images on the machine to the latest versions (where latest tag has been used)docker image prune -ato prune all unused and previous version container images from the hostdocker psto view all the running docker processes on the host.
Portainer
Portainer is a docker container management web GUI. It allows administrators to easily view the status of running containers and perform other actions including:
- Deploying
docker-compose.ymlfiles directly from a GitHub repository, and redeploying existingdocker-compose.ymlfiles to update to the latest container versions- Including auto-deploy when a change to the
mainbranch is made (GitOps Actions)
- Including auto-deploy when a change to the
- A GUI interface for performing container actions including Start, Stop, Restart
- Viewing Docker host configuration including networks
- An easy-to-use interface for using docker in-container shell (accessing the linux shell within a container itself)
- An easy-to-use interface for viewing the logs for any container.
Note that all of the above actions are possible using docker commands directly in the host OS, but Portainer is recommended even if you are using the docker commands directly, as it reduces the barrier to entry for support and troubleshooting issues.
Full documentation on Portainer is located here: https://docs.portainer.io/
Conclusion
Hopefully this article has helped you to get your head around containers and docker. I will be writing a few more articles around Docker, specifically around using a load banacer and setting up Let's Encrypt.
Ryan Drake
Infrastructure Insider - Editor-in-Chief
Copyright 2023, All Rights Reserved.